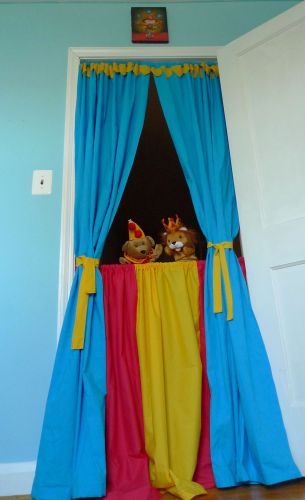
Jennifer, founder of Ellie Bellie Kids, is here as my guest today sharing a fabulous how-to for play time. This puppet theater will be the envy of the neighborhood.
Bold primary colored fabric + tension curtain rods = transformation of a doorway into a stage for your child’s imagination.
Don’t sew?
It’s okay. I used to be afraid of sewing too. This project is a pretty simple one that really only requires you to sew lines. But if you don’t have a sewing machine or the thought of a sewing makes you squirm, you can still do this! Purchase inexpensive curtains (or repurpose old ones you don’t use anymore) and attach embellishments/trim with fabric glue to personalize your creation.
But for the rest of you adventurous sewing souls proceed below.

Circus Inspired Puppet Theater
What you’ll need:
- 5 yards for Side Panels 44/45 width (blue)
- 2 1/2 yards for Skirt 44/45 width (1 1/2 yards red and 1 yellow)
- 3/4 to 1/2 yard for Ties (yellow)
- 2 1/2 yards trim (I used a felt trim I found at my local JoAnns but fringe or any other type of decorative trim would do)
- 2 tension cafe curtain rods
Fabric
I’m a big fan of cotton because it’s washable, durable and is easy to work with. For this project I used 100% cotton broadcloth. If you use a shrinking fabric such as cotton be sure to wash and dry it first. Also I chose fabric that was 45 inches wide so we could use the bound sides naturally and limit the amount we’d have to sew.
Side Panels
Divide the 5 yards into two equal halves.
For Each Half
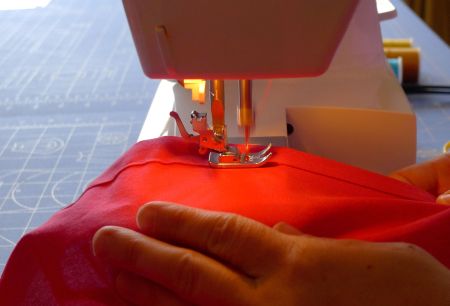
Along the raw edge (the part that is cut) fold the fabric 1 inch from the top and press with an iron. Be sure to measure as you go. Fold again 1 1/2 inches and press again. Sew along the base of the fold 1/4 inch from the base of the fold. This forms the pocket you’ll slide the curtain rod through.

Turn the fabric around and work on the bottom edge. To hem the curtain bottom fold the raw edge 3/4 of an inch and press. Fold again 3/4 to 1 inch (depending on the length of your doorway) and press. Sew along the base of the fold.
Turn the curtain around to once again work at the top. Cut trim to width of each panel. On the side that will face the audience pin the trim approximately 1/2 inch from the stitch you made (running along the base of the pocket you made for the curtain rod). Sew the trim. Repeat on the other panel.

Skirt
You’ll need three pieces of fabric for the skirt. Divide the red into two equal pieces of 3/4 of a yard each. Place the yellow fabric on top of the red (right sides facing together if your fabric has right sides). Sew together creating a seam. You can finish the raw edge of the seam by using a serger or by using a zig-zag stitch. This will help reduce fraying.

Take your second piece of red fabric and place on the yellow to create a seam along the other edge of the yellow fabric. Again you can use a serger or zig-zag stitch along the raw edge to reduce fraying. You now have three panels of fabric joined together. To finish the raw edges on either side of the red panels fold the fabric over 1/2 inch and press. Fold another 1/2 inch and press again. Now sew the side to create a finished edge.

To create a pocket for the curtain rod take the long edge of the panels you’ve joined and fold over 1/2 inch and press. Fold another 1 1/2 inches and press again. Now sew along the base of the fold.
Now it’s time to finish the bottom of the skirt. Fold the bottom 1/2 inch over and press. Fold 1/2 inch again and press. Sew the fold closed.
For ties
You’ll need two six-inch strips of the yellow fabric. You’ll want to make sure you cut the strips perpendicular to the bound edges of the fabric. Fold each strip in half and press. Sew. Turn right-side out (I use a large safety pin but you can also use a bodkin if you have one on hand). Press. You now have what looks like a casing. Tuck in edges of each side and sew closed.
To mount
Take your tension rods and thread one through the two curtain panels and the other through the top of the skirt. Follow the manufacturers instructions (we had a little screw in ours we had to tighten) and voila! You have your very own custom made puppet theater.

Thanks, Jennifer. My kids are going to LOVE putting on a play with their puppets in this theater. For more fun pretending, check out Ellie Bellie Kid’s quarterly magazine Classic Play featuring more great activities for kids!


Thank you for sharing this – I LOVE it. Just what we need here :)
I shared your picture on my blog – hope that is ok :)
Love it! I will have to make this! i linked to it1
LOVE this! It’s so cute! Can I link to it?
This is darling! I have been wanting to buy one but maybe I’ll try my hand at this! Maybe if I’m lucky enough I can con my mom into the sewing!!! ;)
I’ve been wanting to make something like this but I’m not clever enough to figure out how to do it myself. Thanks!
What a great idea – love it!!
Love it! I was just thinking about getting a puppet stage for my daughter’s new playroom!
Too Cute! I love this simple idea for unlimited imagination for kids’ theatres.
I love it! So much fun and totally brings back great memories. I’ll be linking.
Great modification Becca! Way to make it even more approachable.
This has been on my to do list for a few years. Maybe this is the time! With summer coming we are going to need some new entertainment. Thanks for the great idea (reminder)!
This is a SUPER cute idea! I am most. def. going to have to try this one!!
For those of you who are really afraid of sewing and want to skip a couple of steps, buy flat sheets (they can be cheaper than buying fabric) and pillowcases in desired colors.
What a fabulous idea! This is such an easy project too. Thanks so much for sharing this idea. We’ll have to try it out soon.
I love it! And the tension rods make it easy to take down & store, as opposed to all the pre-built (and expensive!) puppet theaters you can buy.