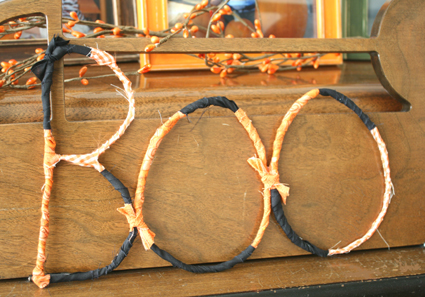
With just a few supplies, you can make your own personalized Halloween decoration! These fabric wrapped letters are so cute and brighten up our Halloween home! There’s no limit to the different letters, numbers, or shapes you can make. So fun!

Boo-tastic Fabric Wrapped Letters
Supplies:
- black and orange fabric, just some scraps!
- craft wire – gauge 20-24 for easy bending
- needle nose pliers
- wire cutters
- hot glue gun
Instructions:
1. Cut small strips of your orange and black fabric. I used alternating colors for my letters, so maybe 7-8 strips per color. This is a great way to use up your fabric scraps! Set these aside.
2. Start at one end of your wire and start to bend it in a letter shape. I made the word BOO, so I used my pliers to bend 3 letters with my wire. Use your wire cutters to clip off the ends of your wire when your letter is created. So this for each shape.
3. Warm up your hot glue gun and add a drop to one side of your wire letter. Add a strip of fabric in any color and start to wrap the fabric around and around. When the fabric runs out, add another drop of hot glue and secure the end of the fabric piece. Start with another piece of fabric where you last one left off.
Continue until all your fabric is used and all 3 letters are covered.
4. To attach all of your letters together for one word, you can either hot glue the sides of the letters together or tie an extra little piece of fabric around each letter where they would touch and tie a knot. I actually like the tied fabric look, so that’s how I did my BOO letters!
You’re done! It’s ready to display!
You’re going to be making these for every holiday, in all sorts of fun holiday words!


Marie – I love this idea! We’re definitely making these! Noah is learning how to spell words and just learned the “oo” sound. “Boo” is perfect for him!
so cute! i need to try this!
Oooh! Love it! Thanks so much for the shout out–those letters look so cute. Great idea!
Ashley – I just used craft wire. I didn’t need pliers or wire cutters for my wire because the pieces came in foot long lengths. Check out Goody Goody’s blog for all the how-to details.
Thrilled – Yep, that’s my piano. I think it’s a great spot too.
darling idea…we have done the tieing to make wreaths and have done it on flip flops but love love this holiday idea!!
So cute! It looks like it’s displayed on your piano? That is the perfect place!
I love all of your fun ideas! I can’t wait to try the fabric wrapped letters.
This is so cool! We’re heading out to buy the supplies for this today. Thanks for posting all these adorable craft ideas. They have been so much fun to make!
Jessica
http://www.momshots.com
This would be a great one for any time of year. Words like “believe” or “dream” would be nice too!
I love that. Did you just use metal hangers and pliers or what?
I saw your “boo sign” yesterday at your house and thought it was adorable. Good Idea!
Marie it’s so fun to see all of your ideas…if only I had the energy to do them! But you really do such a good job with your blog! Thanks for coming by my food blog!
We make Halloween bags for our children, so I have a ton of extra cute halloween fabric. Thank you for the great idea, I know feel better about saving all the leftovers.
You are posting the best crafts for Halloween!! We are making the sticky spider webs today ! Abby is excited.