We’ve come up with a simple way to show off all your festive cards from family and friends! Not only does this Christmas Card Garland make a beautiful display in your home, it’s super fun easy to make!
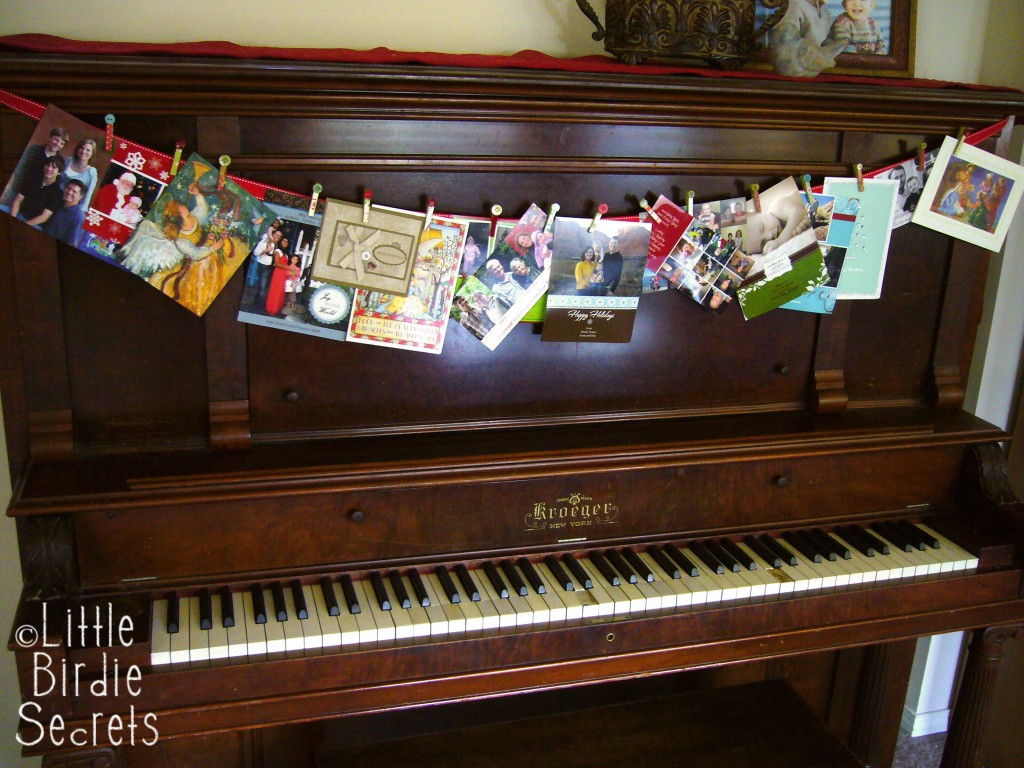
Each year I look forward to receiving Christmas cards and pictures from my friends and loved ones. Sometimes that’s the only time I get to see them all year! So I really love to display each card, but more and more people are sending flat photo cards, which do not stand up on my mantle on their own. That’s why I came up with my Christmas card hanger. It’s quick and easy, and can be hung anywhere, even vertically!
Christmas Card Garland Tutorial
Supplies:
- Small wooden clothespins
- Acrylic paint & foam brush
- Various patterned papers (in Christmas colors, of course!)
- Coordinating buttons
- Decoupage medium & foam brush
- Coordinating buttons
- Hot glue gun
- 3 to 5 yards ribbon (depending on where you hang your garland)
Instructions:
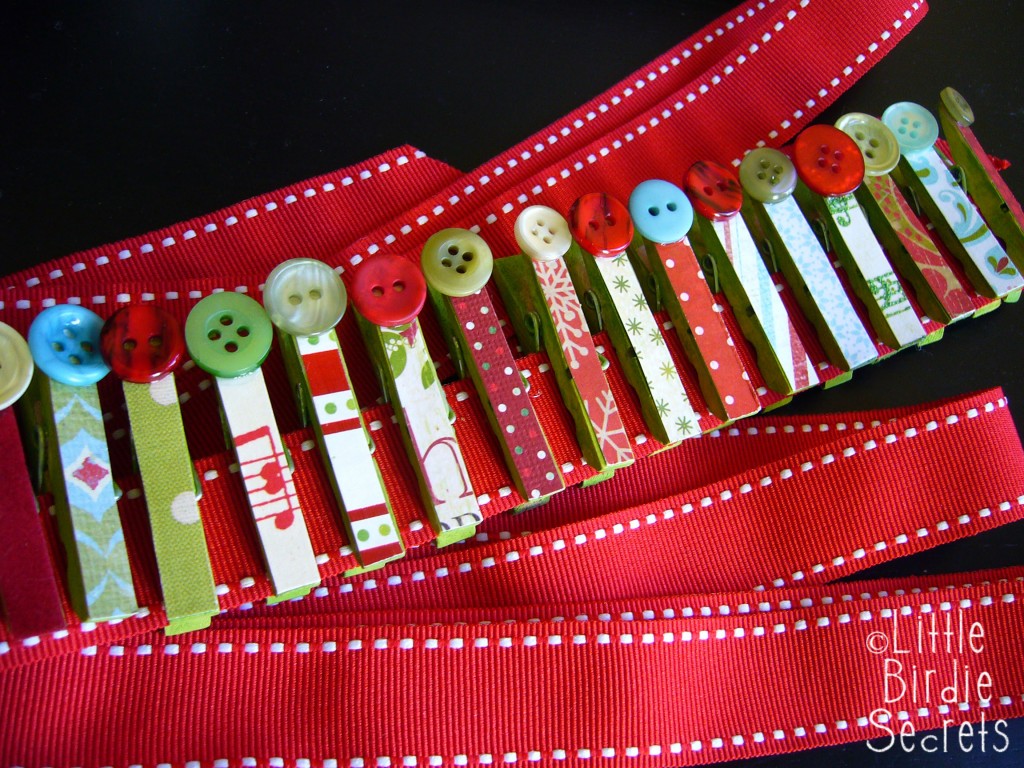
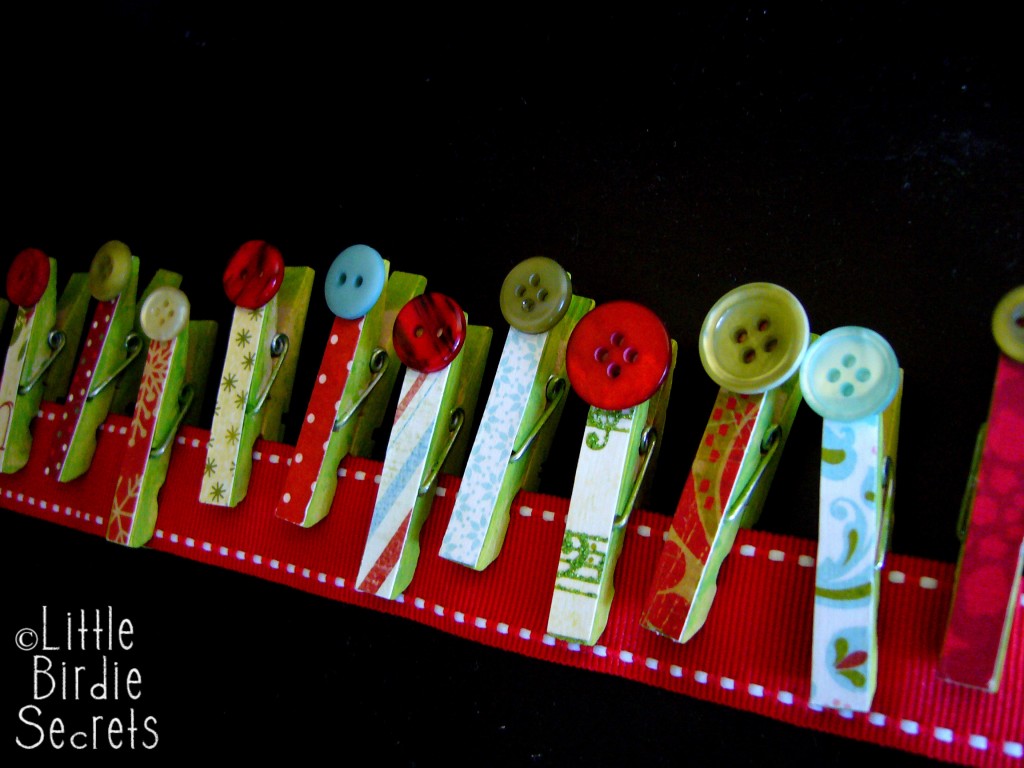
1. Paint your mini clothespins in a color that will coordinate with your patterned papers with your acrylic paint and foam brush. Allow to dry.
2. Trace your clothespin onto patterned paper and cut out. Cut one for each clothespin.
3. Using a foam brush, apply a light coat of Mod Podge on one side of clothespin and attach on of your patterned paper rectangles. Smooth it out with your thumb.
4. Attach a button with hot glue to the top of each clothespin (on the paper side) on the end where you pinch to open the pin.
5. Cut a 3 to 5 yard piece of ribbon for your garland. The length will depend on where you are going to hang it, so measure that and cut accordingly.

Clip Christmas cards to ribbon with clothespins, hang somewhere you can see it, and enjoy all those smiling faces and Christmas wishes!
Try one of these other festive Christmas crafts:
- Christmas Countdown Crafts to Make
- Popsicle Stick Christmas Trees
- Easy Tin Foil Christmas Tree Ornaments
- DIY Christmas Joy Bucket and Burlap Bow
- Holly Jolly Christmas Cards
*Originally posted 12/14/10


To save on time, don’t paint the side of the clothespin that will later have the printed paper. Also paint the side of the clothespin that is the prettiest/smoothest. Use the ugly or irregular side to cover with the printed paper.
One more thing…you can use the same idea to make an advent calendar. Just use 25 clothespins, apply number stickers 1-25 on slips of coordinating Christmas cardstock, and clip to the clothespins. Behind the numbers, you can attach a piece of scripture or an activity to do with your kids, just like other advent calendars.
I sewed the ends of my ribbon in a loop so that I could have the ability to attach to different locations each year (like hooked on heavy stocking hangers on top of the mantle). When hanging on my piano, I tuck the ribbon into the top flap of the upright piano. If yours slips, try putting some heavy holiday ornaments on top of the flap for weight.
Great idea! I made these, but did a few things different. I put mod podge on the clothes pin, then placed them on a piece of patterned paper, let them dry, then cut them out. I also put a sparkle glaze over the top of the paper. Can’t wait to hang them up. Thanks for the idea.
Instead of tracing out each one, I used my paper cutter to cut rectangular strips that were 2 7/8 by 3/8. When applying the paper to the mod podged clothespin, if the slip of paper was slightly bigger than clothespins (since each clothespin varies slightly), I applied the paper to line up perfectly with the side that has metal spring (right side) and let it overhang on the side that does not have the metal spring (left side). Then it was easy to trim away any trim on the left side using a pair of scissors.
Hi, I love this simple but beautiful idea. I am writing an article about Christmas crafts and would love to feature this idea. Please email me asap if you are interested in allowing us to use this idea and photos, you will get full credit of course. My email is [email protected]. Thanks x
Crazy question, I know, but….how do you paint the entire clothes pin? Or, do you skip the part that is the inside clip portion?
How did you attach the ribbon to your piano? I’m doing the same thing (I have a Cabinet Grand) and I don’t want pin holes or tape on it :0)
Love the ribbon you chose! What a great idea. I had to share it on my CraftBliss Facebook page and link back to you. Happy Holidays! ~Dee
I was wondering the same thing as Jennifer – my clothespins make the ribbon too heavy for it to hang anywhere with tape.
That’s a cunning answer to a chalelnging question
I am finished with this project, but how did you attach the ribbon to the piano? With tape? Tape doesn’t usually seem to work for me! Any ideas???
Wow this looks so much cuter than taping them to my wall :)
This is SO cute, looks easy and creative. Thanks so much!
I LOVE this idea!! Thanks so much for the instructions! I can’t wait to make mine!!
I just created these clothespins, but with a different design to hang up my children’s artwork on the wall. Thank you for sharing! I love how they turned out.
This is ADORABLE! I made something very similar, although your clothes pins are way cuter :)
See mine here: http://thewholeenchelleada.blogspot.com/2010/12/holiday-card-garland.html
Happy Holidays!!
Love this idea…we shared it on our blog today as part of our Christmas Craft Roundup! http://bit.ly/GBPcraftychristmas
Possibly the cutest Christmas craft I have seen… and so practical. I love it!
I really like this…crafty and simple, and it stores well! I shared on my blog, She’s Crafty-
http://crafty.littlerockmamas.com/index.php/2010/12/16/25-crafts-of-christmas-nos-19-20-and-21/
Brilliant. I just tape mine to the back of the coat closet. This is adorbs.
This is adorable! I’m going to collect scraps of holiday wrapping paper to glue on the clothespins.
So great. Now I need to find that pretty red ribbon!
Love this! Very cute and simple.
This is precious! I love them hanging from the piano. I had my cards hanging from a ribbon on my mantle, but I just placed the cards over the ribbon and therefore had a problem adding the cards that open from the side. The clothes pins is a great idea!
What a cute way to display all the cards and photocards I get in the mail.
Thanks for sharing!
LOVE IT! Just what craft idea I needed today and I have oodles of clothespins just waiting for the right idea. THANKS a million.
Your timing is perfect! I just got three Christmas cards in the mail, and I wanted to display them, but where? How? Your idea is easy, cheap and cute! Thank you!
This is really cute. I love decoupaging on clothespins, they look so cool!