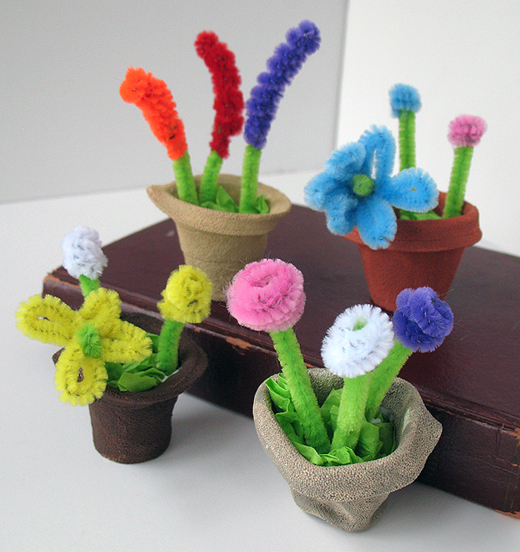
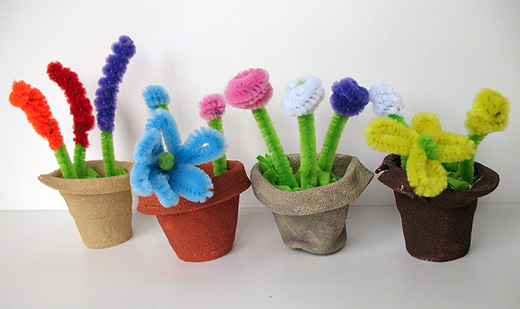
In the past I have made many different hat crafts using foam cups that I shrank in the oven. Yes, much like a Shrinky Dink! However, because shrinking the cups isn’t an exact science, there are often some misshapen hats with curled up brims. Instead of tossing those into the garbage as a failure, I’ve turned them into fun little flower pots to usher in spring!
Supplies for Miniature Flower Pots:
- Foam cups (8.5 oz size)
- acrylic craft paint (we used several brown tones)
- chenille stems in various colors
- green tissue paper
- 4 pennies
- white craft glue
- scissors
1. Preheat oven to 250 degrees F. Place foam cups upside down on a dark coated cookie sheet. Place cookie sheet in preheated oven and watch carefully. Cups should have begun shrinking at the 2 minute mark and should be done at the 3 minute mark. You may need to adjust the temperature up or down depending on your oven, so only try 1-2 cups at a time until you are successful. If you have some brims that are flat, make hats like these miniature spring bonnets!
2. The cups will cool quickly and can be painted within minutes of coming out of the oven. paint each pot, inside and out with acrylic craft paint and let dry.
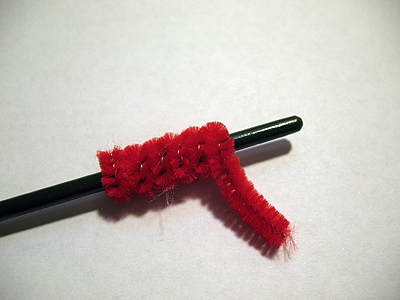
3. Make flowers using different lengths of chenille stems. Use green for the flower stems and a variety of colors to make the flowers. Wrap chenille around the handle of a paintbrush to create flower buds, and twist longer coils to make snapdragons. Form flower shapes by bending a chenille stem into petals and secure it with the end of the chenille stem. Add a dab of white glue and insert the green stem into the colorful flowers.
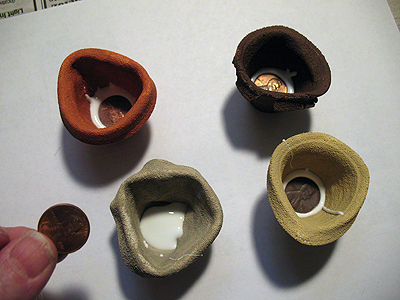
4. Squeeze a generous amount of white craft glue into the bottom of each flower pot. Press a penny into the glue to give the pot some weight. Add more glue to the sides of the inside of the pot.
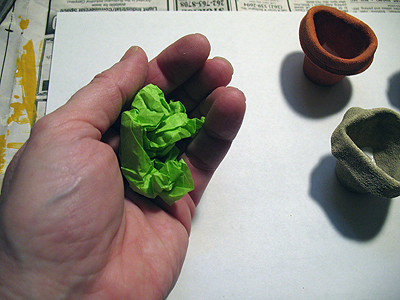
5. Cut a piece of green tissue paper about 5″ square and crumple it in your hand. Place crumpled tissue paper into the pot.
6. Add a dab of glue to the bottom of each flower stem and insert into the flower pot.
Note: I have been making crafts from shrunken foam cups for ten years. In that time I have spoken with a few different experts on the matter of what is emitted from the foam cups when heated. I’ve been told the levels are low enough that it shouldn’t be cause for concern, but that running your kitchen vent or if weather permits, keeping a window open during the baking process is an acceptable solution.


Will use this idea for my students to make mother’s day gifts. Also have a rough poem idea to attach:
Here is a little pot of flowers. They are as special as can be
because they were made for you, by a ‘little’ me
These flowers will not grow, forever little will they stay
But I will grow and change, everyday in every way
Let this little pot of flowers be a reminder to you
Of the days gone by, when I was little too
But just like the little flowers that never change or grow
You will always be my mommy and I will always love you so!
Thanks
Loving the poem, brought a tear to my eye.
Taking 24 Brownies on pack holiday next week and I will have to squeeze this craft and poem into our timetable, their mums will love them when they take them home.
Thanks for all of your great comments!
They look adorable! I wish my kids were old enough to appreciate them. Maybe I should just make them anyway to decorate my craft room.
Love this!! Thanks
Very cute!
The foam cups look just like flower pots, too cute! I think this might be a project we do over Easter break.
Hi Becki! I’ve made these many, many times, but have only ever used the generic foam cups I pick up at Walmart. I say give it a try, just do one at a time to see how they do :)
I love crafts that use things which would otherwise end up in the trash! I plan to try it with the week’s accumulated coffee cups. Have you had success with this type of foam?
These are great! My daughter wants to try these today. :) Thanks!