Spring is coming! Whether your yard is already blooming (like ours here in California), or you’re still waiting for the snow to melt, it’s definitely time to brighten up the indoors with some springtime crafts. Yay!
These pretty paper daffodils, with frilly 3-D centers, are such fun to make (especially the paper curling!), and look adorable on my mantle to boot.

How to Make Paper Daffodils
Supplies:
- paper
- scissors
- glue
- crayons
- tracing bowl
Instructions:
Let’s start with the petals. Trace and cut a circle from yellow construction paper. We used a bowl for tracing.
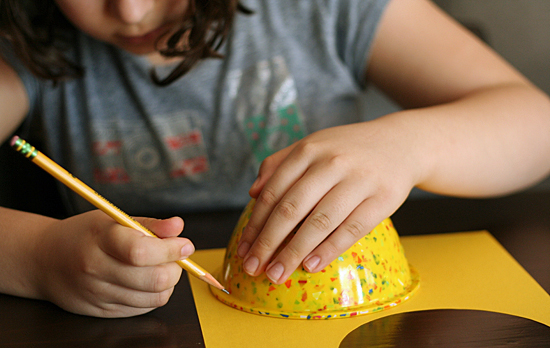
Next, cut small triangles around the circle to create five petals. I free-handed mine, but my girls felt more comfortable sketching out their petals before cutting. Check out the picture below for a basic template – and remember, the petals don’t need to be perfectly spaced!


Give your paper daffodils petals a little more detail by cutting wavy edges. You can also curl them up a bit by rolling a pencil along each petal.

Choose a colored paper for your background, and draw or paste a stem for your daffodil. Glue your petals on your background paper, too.
Now, it’s time to work on the fun 3-D center for the daffodil. Cut a rectangle from yellow or orange construction paper (or another color of your choice!). Our pieces were about 4″ tall and 6″-8″ long. The longer your piece, the more curly frills you will have in the center of the flower. Cut slits along the longer side of your rectangle, leaving an uncut border on one end.

Find something you can roll your paper strip around. We used a wood cylinder from our block bin. A jumbo glue stick would work well, too. Roll the paper around the block, leaving the uncut side hanging off the end. Secure with a bit of glue.

We’re going to make this center piece into a little cup that can be glued onto the petals. With the paper still rolled around the block, start folding the bottom in. Before you fold the last part, add a little glue to secure it.

Don’t pull the block out yet! Add a generous amount of glue to the bottom of your flower center and use the block to help press it down in the middle of the petals. Remove the block and let the glue dry for a bit. While you are waiting, cut and paste some leaves.

Last step – curling! Use a pencil to curl each center strip. Make the curls as tight or loose as you want.

That’s it! I love the frilly pop-out center on these paper daffodils. So fun! Wouldn’t these make adorable Easter or Mother’s Day cards?

Happy spring crafting paper daffodils!

Try making this fun Spring Bird Nesting Mobile this season as well!
*Originally posted 3/17/14


This is simply the best. i love it. What a creativity!
So cute!!! I think I’ll be doing this with my daughter! Thank you! :)
I am collecting art ideas for spring break and this one is perfect! Thanks!